How to implement BlueArch Update Engine in your AWS account (v0.0.5)
Subscribe to the BlueArch Update Engine in AWS Marketplace
- Logged in the account you want to deploy the BlueArch Update Engine, open the marketplace product url in your browser;
- Click on the Continue to Subscribe button;
- Click on the Accept Offer button;
- Click on the Continue to Configuration button;
- On the Fullfillment Option, select the Deploy StepFunctions State Machine option, select the latest version then click on the Continue to Launch button;
- Follow the instructions to deploy the product.
Usage Instructions
Pull the ECR Marketplace Image then push it to your ECR Repository:
ensure you have the following permissions:
- ecr:GetAuthorizationToken
- ecr:BatchCheckLayerAvailability
- ecr:GetDownloadUrlForLayer
- ecr:BatchGetImage
- ecr:CreateRepository
- ecr:PutImage
- ecr:InitiateLayerUpload
- ecr:UploadLayerPart
- ecr:CompleteLayerUpload- Then open CloudShell (recommended) in the desired account/region or a authenticated terminal with the AWS CLI and Docker installed;
- Run the following commands to pull the ECR Marketplace Image:
export ACCOUNT_ID=YOUR_ACCOUNT_ID
export CURRENT_REGION=CURRENT_REGION

aws ecr get-login-password --region us-east-1 | docker login --username AWS --password-stdin 709825985650.dkr.ecr.us-east-1.amazonaws.com/bluearch-io/bluearch_update_engine

docker pull 709825985650.dkr.ecr.us-east-1.amazonaws.com/bluearch-io/bluearch_update_engine:v0.0.5- Create the BlueArch Update Engine ECR Repository in your account (If you already have it, skip this step):
aws ecr create-repository --repository-name bluearch-io/bluearch_update_engine- Push the ECR Marketplace Image to your ECR Repository:
aws ecr get-login-password --region us-east-1 | docker login --username AWS --password-stdin $ACCOUNT_ID.dkr.ecr.$CURRENT_REGION.amazonaws.com

docker tag 709825985650.dkr.ecr.us-east-1.amazonaws.com/bluearch-io/bluearch_update_engine:v0.0.5 $ACCOUNT_ID.dkr.ecr.us-east-1.amazonaws.com/bluearch-io/bluearch_update_engine:v0.0.5

docker push $ACCOUNT_ID.dkr.ecr.$CURRENT_REGION.amazonaws.com/bluearch-io/bluearch_update_engine:v0.0.5
Choose one of the following options to deploy the BlueArch Update Engine:
1- Single AWS Account deployment using CloudFormation + Step Functions
- Open the Single Account Cloudformation link in your browser;
- Fill in the parameters mentioned in the next section and click Next.
- Click Next again.
- Check the box I acknowledge that AWS CloudFormation might create IAM resources and click Create stack.
- Wait for the stack to be created.
2- Organization level deployment (Manager Account) using CloudFormation StackSet + Step Functions
- Open the Org Level Cloudformation link in your browser;
- If you do not have Trusted Access with AWS Organizations to use service-managed permissions (Doc reference), this banner will appear:

- Select Activate trusted access. Trusted access is successfully activated when the following banner displays:

- Fill in the parameters mentioned in the next section and click Next.
- Click Next again.
- Check the box I acknowledge that AWS CloudFormation might create IAM resources and click Create stack.
- Wait for the stack to be created.
CloudFormation Parameters
Organization Parameters
Organization ID*: Your Organization ID (ex r-1234, ou-abcd-12345). Either root organization id or OU ids. You can find it in the AWS Console, Organizations menu: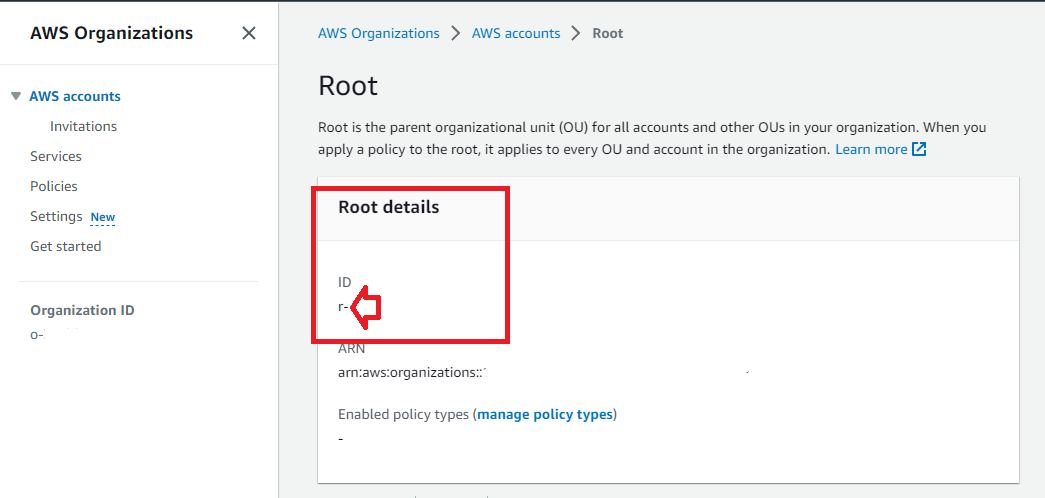
AWS Account IDs(optional): List of additional AWS Accounts to be scanned outside the selected organization IDs.
Update Engine General Configuration
Email list*: List of email addresses to receive Excel report files (comma separated).Workspace Name`* (must be unique)`: The name of the workspace to be created (Will be used in S3 paths).Update EBS Volumes?: If you want to update EBS Volumes, selecttrue. Otherwise, selectfalse. Rules:- io1 volumes will be updated to io2.
- gp2 volumes will be updated to gp3.
Terminate Old EC2 Instances?: If you want to terminate old EC2 Instances, selecttrue. Otherwise, selectfalse. Rules:- EC2 Instances that are not running and stopped for more than
Number of Days to delete old EC2 instancesdays will be terminated.
- EC2 Instances that are not running and stopped for more than
Number of Days to delete old EC2 instances: Number of days to delete old EC2 instances.Increase Service Quotas?: If you want to increase service quotas, selecttrue. Otherwise, selectfalse.To be implemented.Service Quotas Critical Threshold: The critical threshold for service quotas. If the service quota is above this threshold, the application will increase it.To be implemented.
Step Functions Configurations
Schedule Expression*: The schedule expression for the Step Functions State Machine. More information about Schedule Expressions.Lambda Max Concurrent Executions*: The maximum number of concurrent executions for the Lambda functions that will be triggered by the Step Functions State Machine.Docker Image Version*: The Docker Image Version that will be used by the Step Functions State Machine. Check the available versions here.
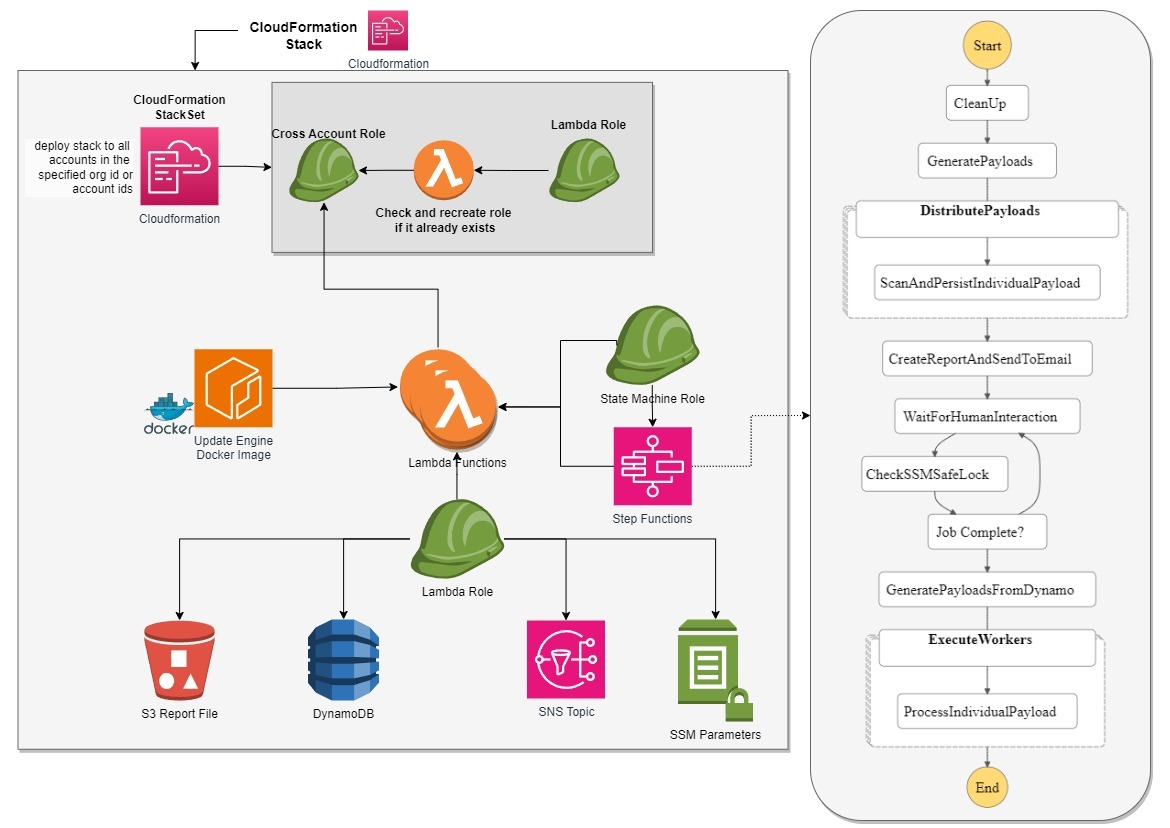
Architectural Diagram
Resources Created by the CloudFormation StackSet
| Resource | Description |
|---|---|
| S3ReportBucket | The S3 Bucket where Update Engine will store its Excel report files. |
| LambdaRole | IAM Role that allows the application to interact with the Update Engine resources inside the current account. |
| StepFunctionsExecutionRole | IAM Role that allows AWS Step Functions to interact with the Lambda Function. |
| EmailSNSTopic | AWS SNS Topic - The application will send the excel report file through this topic everytime it runs all emails inside the EMailList Parameter. |
| CrossAccountAccessRoleForBlueArch | IAM Role that allows the application to assume it and collect the necessary data for the application to work. |
| BlueArchRoleStackSet | CloudFormation Stackset that will deploy the CrossAccountAccessRoleForBlueArch in all accounts inside the organization. More information about StackSets. |
| DynamoDBTable | DynamoDB table that will store AWS resource information’s (id, account, region, resource type) and the SSM SafeLock token. |
| Lambda | Lambda function that will be triggered by the Step Functions State Machine. |
| SafeLockSSMParameter | The SSM Parameter the user will use to put the Safe Lock Token. |
| UpdateEngineStateMachine | The Step Functions State Machine that will orchestrate the application. |
| CronEventRule | The CloudWatch Rule that will trigger the Step Functions State Machine in a weekly basis |
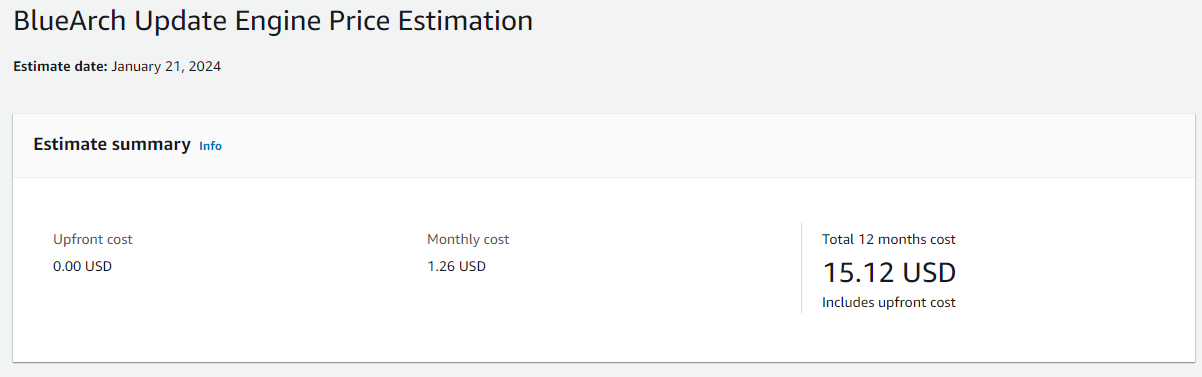
AWS price estimation
The Application
How to start the application
- Check your inbox, you should have received an email with the sns topic confirmation link. Click on it to confirm your subscription.
- Start the Step Functions State Machine execution by searching for Step Functions in the AWS Console, clicking on it, and then clicking on the
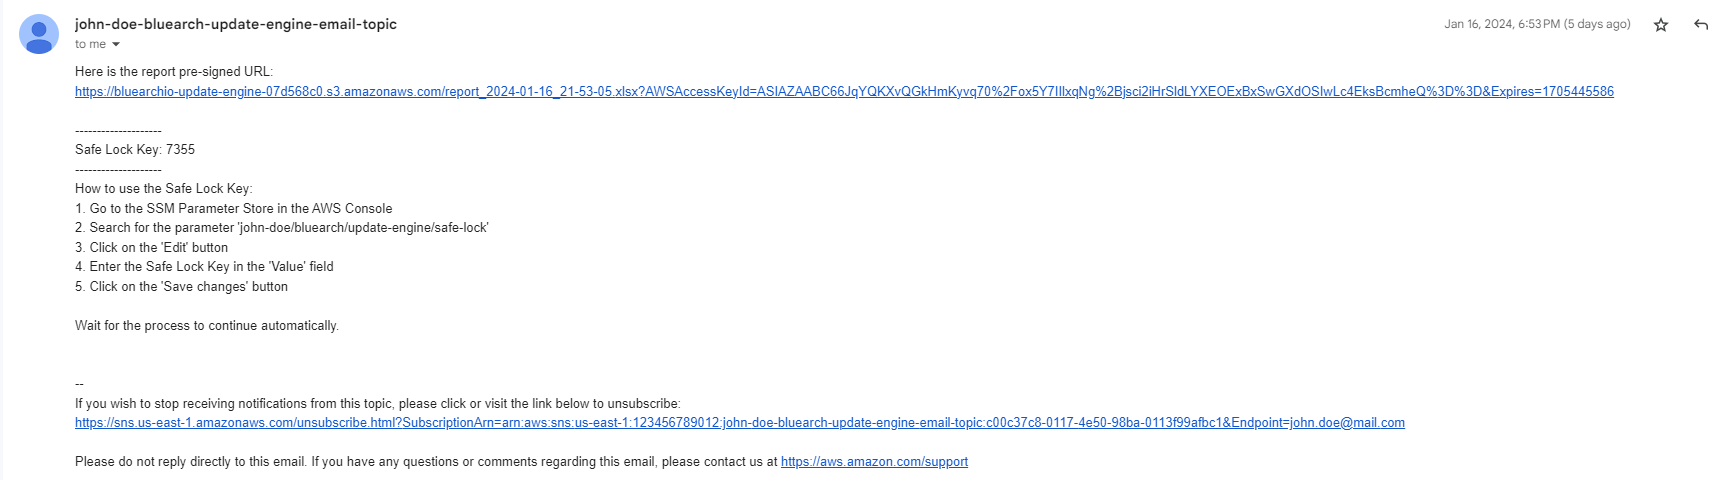
bluearch-update-enginestate machine. Click on the Start Execution button and then click on the Start Execution button again. - Now you should have received a new email with the Excel report file URL. Click on it to download the file and check the resources that are going to be updated. You should also be able to find the user instruction showing how to unlock the SSM Safe Lock .
- Once you have unlocked the SSM Safe Lock, the application will be able to execute all updates that are listed in the Excel report file.
How the Application Works
Update Engine scans the Organization that is set in the CloudFormation Parameters, collect resources details, stores them in DynamoDB Table, processes the collected information, and sends the Excel report file and the SSM SafeLock token to the emails listed in the Email list parameter. Once the SSM SafeLock is unlocked, the application will be able to execute all updates that are listed in the Excel report file.
Table of Steps
| Step | Description |
|---|---|
| CleanUp | Starts the process by cleaning up the DynamoDB table. |
| GeneratePayloads | Generates payloads containing Account id, Resource type and ids, for individual processing in the next steps. |
| DistributePayloads | Distributes payloads for parallel processing. |
| ScanAndPersistIndividualPayload | Processes individual payloads and stores the results in DynamoDB (Read Only step). |
| CreateReportAndSendToEmail | Creates and emails a excel report file based on stored data, along with the SSM SafeLock token and instructions showing how to use it. |
| WaitForHumanInteraction | Pauses for human interaction or input. |
| CheckSSMSafeLock | Checks a condition or lock in AWS SSM. |
| Job Complete? | Decides the next step based on SSM SafeLock status. |
| GeneratePayloadsFromDynamo | Generates payloads from DynamoDB table for parallel processing. |
| ExecuteWorkers | Map state that will generate payloads based on the DynamoDB items and execute the workers. |
| ProcessIndividualPayload | Processes DynamoDB payloads in parallel. |
Step Functions Graph

Customer Information Disclaimer
BlueArch Update Engine data security and privacy are paramount. We want to provide you with a clear understanding of how we handle your customer information:
- Your email address is exclusively used for sending SNS (Simple Notification Service) emails.
- Your customer information remains securely within your AWS (Amazon Web Services) account, with no external access.
- Data excel report files are stored in your S3 bucket, and the S3 bucket is not publicly accessible.
- Data store in DynamoDB Table is temporary and will be deleted after the execution of the application.
- You can check all excel report files in the
bluearchio-update-engine-xxxxxxxxxxxxS3 bucket. - No sensitive data is stored, and the application does not use encryption keys or any other sensitive data.
How to monitor the application
Check the State Machine Execution
- Navigate to the AWS Console, search for Step Functions, and click on it.
- Look for the
bluearch-update-enginestate machine. - Click on the state machine name to see the previous executions.
- Then click on the execution id to see the execution details.
- You can see the execution details, input, output, and logs.
- You can also see the state machine graph and the state machine logs.
Checking the Logs
- Navigate to the AWS Console, search for Step Functions, and click on it.
- Look for the
bluearch-update-enginestate machine. - Clock the log group link in the state machine details.

How to remove everything
- Empty the S3 bucket created by the CloudFormation StackSet:
- Navigate to the AWS Console, search for S3, and click on it.
- Click on the
bluearchio-update-enginebucket. - Click on the Empty button.
- Type
permanently deletein the confirmation box and click Empty.
- Delete the Cloudformation Stack you created:
- Navigate to the AWS Console, search for CloudFormation, and click on it.
- Under Stack section, click on the BlueArch Update Engine you’ve created before.
- Click on the Delete button.
- Wait for the stack to be deleted.
Supported Resources in the Current Version (v0.0.5):
EC2 Instances
- Terminate EC2 Instances that are stopped for more than
Number of Days to delete old EC2 instancesdays
EBS
- Update EBS Volumes from io1 to io2
- Update EBS Volumes from gp2 to gp3